You can retrieve information from UDCloud1 using either the Code42 CrashPlan application or the web-based application. If you have used CrashPlan to store your backup set locally, use the Code42 CrashPlan application.
Using the Code42 CrashPlan app to retrieve files
-
Start CrashPlan.
-
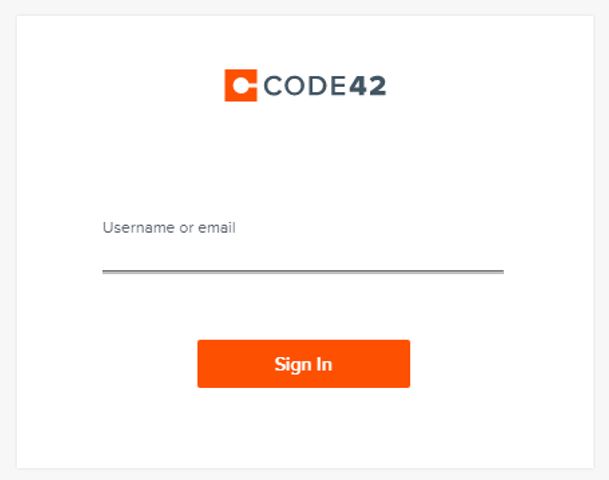
Type your UDelNet ID on the Code42 sign in screen. Then click the Sign In button to be taken to the UD CAS login screen.
-
Your user name is your full UD email address.
-
If clicking Sign In does not take you to the UD CAS login screen, your UDelNet ID is not recognized. Contact your departmental or college IT staff for assistance.
|
-
On the standard UD CAS login screen, log in using your UDelNet ID and password, and, on the next screen, provide your 2FA code. Information about UD two-factor authentication [2FA].
-
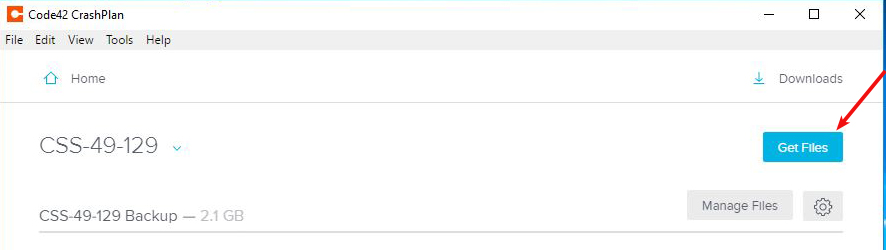
Select Get Files corresponding to the proper machine from the CrashPlan application home page.
-
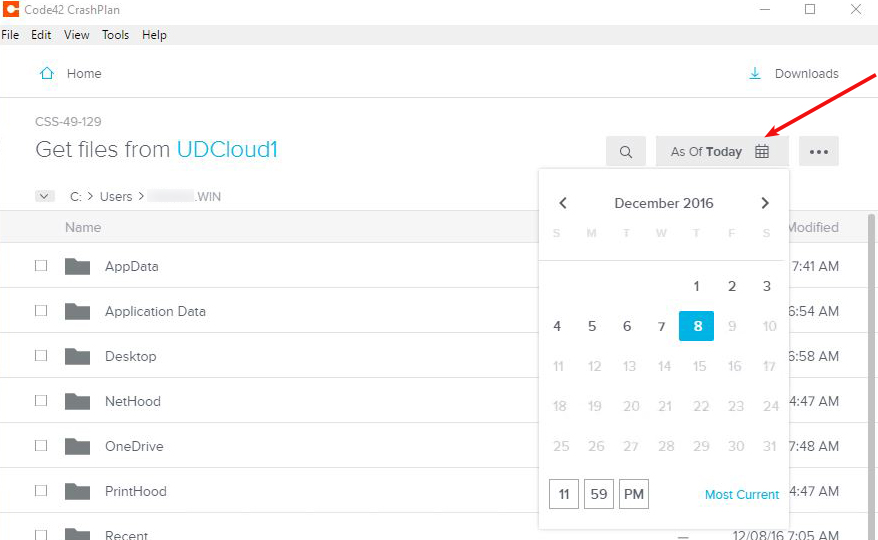
On the next screen, check the boxes next to the names of the files or folders you would like to retrieve.

- You may also retrieve files from an earlier date and time by selecting the calendar icon.
-
When finished selecting files, click Get Files.

-
Specify where files are to be restored to.
-
You may restore files to the original location, to the desktop, or any other folder you select. The Other dialog box will allow you to create new folders.
-
You may also choose what to do if a duplicate file name exists.
-
Note that if you back up additional machines, all files and folders from those machines are backed up as well.
-
You may also change permissions to those of the destination folder (Current) or those of the folder from which it was backed up (Original).
Retrieving files from the web-based application
-
You do not need to have CrashPlan installed on a machine to allow you to retrieve files, you may do this directly from the web.
-
However, there is a restriction on retrieving files from the web-based application: You may only use this technique to recover less than 250MB of data.
-
In any browser, go to https://console.us2.crashplan.com. Off-campus users must log in to the UD VPN to access this page.
-
Log in to Code42 CrashPlan by typing your full UD email address, clicking the Sign In button, and logging in on the UD CAS screen.
-
Navigate to Devices and use the checkboxes to select the computer or computers whose files you wish to restore.
-
On the next screen, click the Restore icon
-
Use the Web Restore dialg box to select files and folders to restore.
You may specify which versions of files an folders to restore based on a specific date and time.
- Once you have all the files and folders selected, click the Restore button.
- The default for web restore is to restore all selected files to a .ZIP file on the local machine. The same directory structure will be maintained.